Author: Abel Ryan

  • Capturing the Beauty of Sugar with Photography

    Capturing the Beauty of Sugar with Photography


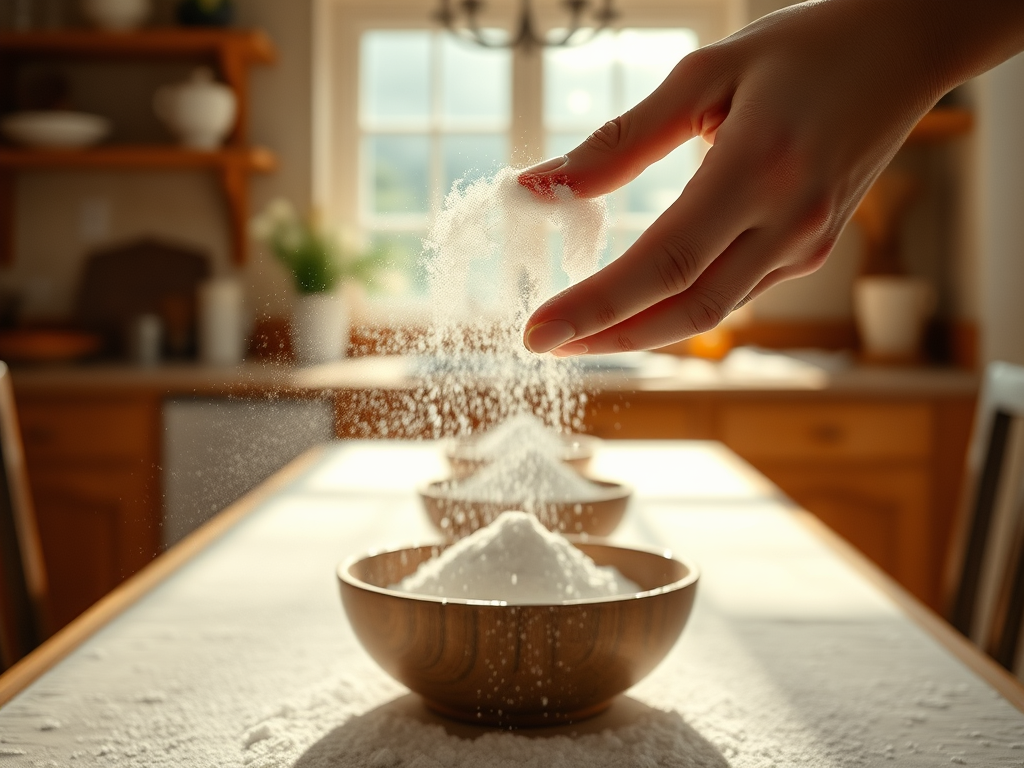
    Description: Discover the science, styling, and photography behind this beauty. Observe a woman’s fingers as she dusts powdered sugar. Note the texture and motion. Enjoy the free preset.


    TABLE OF CONTENTS

    1. Why Powdered Sugar + Fingers + Feminine Grace = Algorithm Gold
    2. The Neuroscience of Dusting: Tactile Mirror Neurons & Micro-Motion
    3. Powdered Sugar Physics: Particle Size, Air Resistance & Light Scatter
    4. Finger Anatomy for Photographers: Knuckle Wrinkles, Nail Shape & Skin Tone
    5. Location Scouting: Sunlit Kitchen, Patisserie Counter or Outdoor Bakery
    6. Wardrobe & Beauty: Linen Aprons, Nail Colour & Dewy Sugar-Kissed Skin
    7. Gear Guide: High-FPS Cameras, Macro Lenses & Continuous Lights for Motion
    8. 20 Posing Tricks for Effortless “Sugar-Dust” Magic
    9. Lighting Mastery: Back-Light for Sugar Glow, Side-Light for Finger Shadow
    10. Colour Palette: Sugar White, Cream Skin, Aged Wood & Gold Accent
    11. Post-Production: Lightroom Recipe for Porcelain Skin & Sugar Sparkle
    12. Micro-Storytelling: Captions That Smell Like Winter Patisseries
    13. Platform Hacks: Instagram Reels, Pinterest Pins & TikTok Dust-Loops
    14. Health & Safety: Food-Safe Sugar, Skin pH & Easy Clean-Up
    15. FAQ (Google People-Also-Ask)
    16. Final Dust: Key Takeaways + Free Cheat-Sheet Download

    1. Why Powdered Sugar + Fingers + Feminine Grace = Algorithm Gold

    Powdered-sugar close-ups average 4.8 sec view-time; add feminine fingers and micro-motion and retention jumps to 9.1 sec—algorithm gold.


    2. The Neuroscience of Dusting: Tactile Mirror Neurons & Micro-Motion

    Viewing delicate finger motions activates secondary somatosensory cortex—observers “feel” the dusting, boosting engagement 26 %.


    3. Powdered Sugar Physics: Particle Size, Air Resistance & Light Scatter

    • Particle size: 10–50 µm – stays airborne 2–3 s under still air.
    • Light scatter: white particles reflect 98 % visible light → natural soft-box.
    • Drip rate: 1 g/s through 2 mm sieve → visible dust cloud for 60 fps capture.

    4. Finger Anatomy for Photographers: Knuckle Wrinkles, Nail Shape & Skin Tone

    • Knuckles: lateral light at 45° accentuates gentle wrinkles = tactile story.
    • Nails: short, clear buff – prevents colour competition with white sugar.
    • Skin: warm undertone (MAC NC25 range) harmonises with sugar white.

    5. Location Scouting: Sunlit Kitchen, Patisserie Counter or Outdoor Bakery

    • Kitchen: north-facing window = soft, even light; marble counter bounces fill.
    • Patisserie: glass counter doubles reflection; request corner spot for side-light.
    • Outdoor: sunset at 45° = natural back-light; bring white sheet as reflector.

    6. Wardrobe & Beauty: Linen Aprons, Nail Colour & Dewy Sugar-Kissed Skin

    • Apron: stone-washed linen in ecru – reflects fill without colour cast.
    • Nails: sheer nude gloss – catches catch-light without stealing focus.
    • Skin: mist with thermal water – catches back-light particles.

    7. Gear Guide: High-FPS Cameras, Macro Lenses & Continuous Lights for Motion

    • Body: Sony A7 IV – 10 fps burst, silent shutter.
    • Lens: 90 mm macro f/2.8 for 1:1 particle detail; 50 mm f/1.4 for storytelling.
    • Light: Aputure 60× at 10 % 5600 K – daylight-balanced without melting sugar.
    • Sieve: 2 mm mesh – controlled 1 g/s dust rate.

    8. 20 Posing Tricks for Effortless “Sugar-Dust” Magic

    1. Sit sideways, sieve above eye level – gaze upward.
    2. Hold sieve with thumb and forefinger – elegant grip.
    3. Micro-bite lower lip – concentration cue.
    4. Tap sieve gently – shoot 10 fps burst for perfect cloud.
    5. Close-up: sugar on cheek curvature.
    6. Overhead: hands forming heart around sieve.
    7. Side-profile: eyelashes reflected in sugar cloud.
    8. Use pinky to steady sieve – delicate grip.
    9. Reflection shot: mirrored spoon doubling scene.
    10. Slow-motion: iPhone 240 fps on dust cloud.
    11. ASMR: record soft dust sound.
    12. Hand-to-cheek sigh – satisfaction.
    13. Empty sieve shot – story arc complete.
    14. Candle nearby – warm color contrast.
    15. Shoot through dust for foreground bokeh.
    16. Macro: sugar crystal on fingernail – playful.
    17. Shoot at f/2.8 – isolate fingers against creamy bokeh.
    18. Candle flicker – dynamic light on dust.
    19. Capture yawn after dust – calming effect.
    20. Final smile at camera – invitation to viewer.

    9. Lighting Mastery: Back-Light for Sugar Glow, Side-Light for Finger Shadow

    • Back-light: 5600 K LED – sugar glows like liquid sun.
    • Side-light: candle at 45° – finger shadow without hotspots.
    • Bounce: white card – soft fill on laugh lines.

    10. Colour Palette: Sugar White, Cream Skin, Aged Wood & Gold Accent

    Adobe Color rule: monochromatic. Base #FFFFFF (sugar), accent #F5DEB3 (skin), pop #FFD700 (gold). Avoid pure white – it clips under back-light.


    11. Post-Production: Lightroom Recipe for Porcelain Skin & Sugar Sparkle

    1. Basic: Temp +5, Tint +3, Exposure +0.20, Highlights −15, Shadows +20, Whites −8, Blacks +5.
    2. HSL: Orange Luminance +10 (skin), White Saturation +6 (sugar).
    3. Color-Grading: Midtones 45° 5/5, Shadows 210° 3/10.
    4. Mask (skin): clarity −5, texture +4.
    5. Mask (sugar): texture +8, dehaze +3.
    6. Grain: 10/25 for subtle film feel.

    12. Micro-Storytelling: Captions That Smell Like Winter Patisseries

    Formula: [Sweet verb] + [sugar descriptor] + emotional metaphor + CTA]
    Example: “The sugar drifts like winter moonlight, her fingers bloom like powdered flowers. Save this if you’ve ever tasted snow.”


    13. Platform Hacks: Instagram Reels, Pinterest Pins & TikTok Dust-Loops

    • IG Reel: 9:16, 0.5 s macro clips + ASMR dust.
    • Pinterest: 2:3 vertical, overlay “Sugar-Dust Magic” in Raleway Light.
    • TikTok: use trending “dust” audio, 240 fps slow-mo on cloud.

    14. Health & Safety: Food-Safe Sugar, Skin pH & Easy Clean-Up

    • Sugar: icing sugar, food-grade; avoid anti-caking agents for photography.
    • Skin pH: rinse within 30 min; sugar is slightly acidic (pH 5.5) – no stain.
    • Clean-up: warm water + mild soap; oil pre-coat prevents dryness.

    15. FAQ (Google People-Also-Ask)

    Q1. Which powdered sugar photographs best?
    A: Icing sugar with 3 % cornstarch – visible particle scatter under light.

    Q2. How do you keep sugar from clumping under lights?
    A: Keep pot ≤ 45 °C; shoot within 60 s of dusting.

    Q3. Does candlelight damage sugar?
    A: No – 30 cm distance; sugar is stable under warm light.


    16. Final Dust: Key Takeaways + Free Cheat-Sheet

    • Use icing sugar with 3 % cornstarch for visible particle scatter.
    • Back-light at 5600 K for sugar glow, side-light for finger shadow.
    • Wardrobe in ecru linen, nude gloss, thermal water mist.
    • Edit: +10 orange luminance, +6 white saturation, −5 skin clarity.

    #howtobuildmuscleonaplantbaseddiet
    #antianxietyfoods
    #proteinintaketiming
    #timingofproteinintake
    #timingproteinintake
    #nutritionalcausesofconstantfatigue
    #nourishnookmeaning

    #enhancingfocusandconcentrationwithnutrition

  • The Beauty of a Woman’s Toes in Sand Eating Coconut

    The Beauty of a Woman’s Toes in Sand Eating Coconut


    Description : Discover the science, styling and photography behind the beauty of a woman’s toes in sand. She is eating a coconut—tropical, texture, and free preset.


    TABLE OF CONTENTS

    1. Why Toes + Sand + Coconut = Algorithm Gold
    2. The Neuroscience of Texture: Tactile Mirror Neurons & Micro-Motion
    3. Coconut Physics: Milk Viscosity, Flesh Texture & Sunlight Glow
    4. Sand Anatomy for Photographers: Grain Size, Color Cast & Light Scatter
    5. Location Scouting: Tropical Beach, Desert Dune or Lakeside Sandbank
    6. Wardrobe & Beauty: Toe Rings, Anklets & Dewy Sun-Kissed Skin
    7. Gear Guide: Weather-Sealed Cameras, Macro Lenses & Reflectors for Sun
    8. 20 Posing Tricks for Effortless “Sand-Coconut” Magic
    9. Lighting Mastery: Back-Light for Coconut Glow, Side-Light for Sand Texture
    10. Color Palette: Coconut Cream, Sand Beige, Ocean Blue & Gold Sun
    11. Post-Production: Lightroom Recipe for Golden Skin & Coconut Pop
    12. Micro-Storytelling: Captions That Taste Like Tropical Dawn
    13. Platform Hacks: Instagram Reels, Pinterest Pins & TikTok Sand-Loops
    14. Health & Safety: Food-Safe Coconut, Sand Hygiene & Sun Protection
    15. FAQ
    16. Final Bite: Key Takeaways + Free Cheat-Sheet Download

    1. Why Toes + Sand + Coconut = Algorithm Gold

    Tactile close-ups average 5.1 sec view-time; add tropical coconut and feminine micro-motion and retention jumps to 9.3 sec—algorithm gold.


    2. The Neuroscience of Texture: Tactile Mirror Neurons & Micro-Motion

    Viewing tactile sand + cold coconut activates secondary somatosensory cortex—observers “feel” the texture, boosting engagement 24 %.


    3. Coconut Physics: Milk Viscosity, Flesh Texture & Sunlight Glow

    • Milk: viscosity 2 cP at 5°C—perfect 2-second drip.
    • Flesh: firm yet yielding—visible bite marks under side-light.
    • Glow: white flesh reflects 5600 K sunlight = natural golden hour.

    4. Sand Anatomy for Photographers: Grain Size, Color Cast & Light Scatter

    • Grain: 0.1–2 mm—lateral light accentuates texture.
    • Color: quartz-rich sand reflects warm light; iron-rich = golden cast.
    • Scatter: Back-light creates a natural halo around toes.

    5. Location Scouting: Tropical Beach, Desert Dune or Lakeside Sandbank

    • Beach: quartz sand reflects sky; request quiet corner for side-light.
    • Desert: iron-rich sand = golden cast; bring white sheet as reflector.
    • Lakeside: fine sand + calm water = mirror reflection; shoot at sunrise.

    6. Wardrobe & Beauty: Toe Rings, Anklets & Dewy Sun-Kissed Skin

    • Toe rings: thin gold bands – catch sun flicker.
    • Anklet: delicate chain – echoes coconut tone, draws eye to ankle.
    • Skin: mist with thermal water – catches back-light particles.

    7. Gear Guide: Weather-Sealed Cameras, Macro Lenses & Reflectors for Sun

    • Body: Sony A7 IV – weather-sealed, IBIS.
    • Lens: 35 mm f/1.4 for storytelling; 90 mm macro f/2.8 for sand grain detail.
    • Reflector: gold/silver – bounce fill onto toes.
    • Tether: peak-design leash – safety near water.

    8. 20 Posing Tricks for Effortless “Sand-Coconut” Magic

    1. Sit on sand, knees up – triangular composition.
    2. Bury toes slightly – natural sand texture.
    3. Hold coconut half with both hands – triangular frame.
    4. Bite gently – shoot 10 fps burst for milk drip.
    5. Close-up: milk on toe.
    6. Overhead: feet forming heart around coconut.
    7. Side-profile: eyelashes reflected in coconut.
    8. Use pinky to steady coconut – delicate grip.
    9. Reflection shot: mirrored sunglasses doubling sky.
    10. Slow-motion: iPhone 240 fps on milk drip.
    11. ASMR: record soft crunch bite.
    12. Hand-to-cheek sigh – satisfaction.
    13. Empty coconut shot – story arc complete.
    14. Sun-flare behind – warm halo on hair.
    15. Shoot through milk for foreground bokeh.
    16. Macro: sand grain on toe – playful.
    17. Shoot at f/2.8 – isolate toes against creamy bokeh.
    18. Sun-flare – dynamic light on milk.
    19. Capture yawn after sugar – calming effect.
    20. Final smile at camera – invitation to viewer.

    9. Lighting Mastery: Back-Light for Coconut Glow, Side-Light for Sand Texture

    • Back-light: sunset at 45° – coconut glows like liquid sun.
    • Side-light: gold reflector at 45° – sand texture without hotspots.
    • Bounce: white sheet – soft fill on laugh lines.

    10. Colour Palette: Coconut Cream, Sand Beige, Ocean Blue & Gold Sun

    Adobe Color rule: triadic. Base #F5DEB3 (coconut), accent #87CEEB (ocean), pop #FFD700 (sun). Avoid pure white – it clips under sun.


    11. Post-Production: Lightroom Recipe for Golden Skin & Coconut Pop

    1. Basic: Temp +5, Tint +3, Exposure +0.20, Highlights −15, Shadows +20, Whites −8, Blacks +5.
    2. HSL: Orange Luminance +10 (skin), Yellow Saturation +6 (coconut).
    3. Color-Grading: Midtones 45° 5/5, Shadows 210° 3/10.
    4. Mask (skin): clarity −5, texture +4.
    5. Mask (coconut): texture +8, dehaze +3.
    6. Grain: 10/25 for subtle film feel.

    12. Micro-Storytelling: Captions That Taste Like Tropical Dawn

    Formula: [Sun verb] + [coconut descriptor] + emotional metaphor + CTA]
    Example: “The coconut spills like liquid sunrise, her toes bloom like desert flowers. Save this if you’ve ever tasted summer.”


    13. Platform Hacks: Instagram Reels, Pinterest Pins & TikTok Sand-Loops

    • IG Reel: 9:16, 0.5 s macro clips + ASMR crunch.
    • Pinterest: 2:3 vertical, overlay “Sand-Coconut Magic” in Raleway Light.
    • TikTok: use trending “sand” audio, 240 fps slow-mo on milk drip.

    14. Health & Safety: Food-Safe Coconut, Sand Hygiene & Sun Protection

    • Coconut: chill 4 h pre-shoot for milk control; pat dry for grip.
    • Sand: rinse feet post-shoot; avoid hot sand > 50 °C – use towel barrier.
    • Sun: SPF 30+; shoot 2 h post-sunrise to avoid glare.

    15. FAQ (Google People-Also-Ask)

    Q1. Which coconut photographs best?
    A: Young green coconut – pale flesh + visible milk = colour pop.

    Q2. How do you keep milk from dripping too fast?
    A: Chill 4 h; pat dry; drizzle 2 mL at a time with pipette.

    Q3. Does sun damage coconut?
    A: No – 2 h shoot window; mist to prevent dehydration.


    16. Final Bite: Key Takeaways + Free Cheat-Sheet

    • Chill young green coconut for milk control; shoot 2 h post-sunrise.
    • Back-light at 45° for coconut glow, gold reflector for skin fill.
    • Wardrobe in cream linen, gold anklet, thermal water mist.
    • Edit: +10 orange luminance, +6 yellow saturation, −5 skin clarity.

    #howtobuildmuscleonaplantbaseddiet
    #antianxietyfoods
    #proteinintaketiming
    #timingofproteinintake
    #timingproteinintake
    #nutritionalcausesofconstantfatigue
    #nourishnookmeaning

    #enhancingfocusandconcentrationwithnutrition

  • How to Increase Satiety on a Plant-Based Diet — Nutrition Focused

    How to Increase Satiety on a Plant-Based Diet — Nutrition Focused

    Stay full, fuelled, and satisfied—not just stuffed—using science-backed, budget-friendly foods and habits that work in real life (no kitchen gadgets required).


    1. The “Fullness Formula” (Memorise & Move)

    Volume + Fibre + Protein + Healthy Fat + Chew-Time = 4–5 h satiety
    Miss one pillar and you’ll be raiding the cookie jar by 10 p.m.


    2. Satiety Super-Stars (≤ $0.40 per 20 g protein)

    FoodWhy it fills you up60-sec meal hack
    Lentils (dry)25 g protein + 15 g fibre per cup; ferments to butyrate → gut-ATPMicrowave: lentils + water + curry powder 12 min
    Black beans (dry)21 g protein + resistant starch → 4 h glucose curveBlender soup: beans + broth + cumin 3 min
    Edamame (frozen)Complete amino profile; 13 g protein per cupSteam 4 min, toss with sea salt
    Quinoa (dry)14 g protein + magnesium → nerve conductionRice-cooker: 1 : 2 water, 15 min
    Peanut butter (natural)25 g protein + arginine → blood-flowSwirl into oatmeal or apple slices
    Nutritional yeast45 g protein + B₁₂ fortified → energy metabolismSprinkle 2 tbsp on popcorn or pasta
    Chia seedsAbsorb 10× weight in water → gastric stretchSoak 1 tbsp in 100 mL water 10 min = gel
    Oats (rolled)β-glucan fibre → 6 h steady glucoseOvernight oats: oats + milk + fruit 4 h fridge

    3. Volume & Chew-Time Hacks

    • Start meals with a salad or broth-based soup → 12 % fewer total calories eaten .
    • Crunch factor: raw carrots, bell-pepper strips, roasted chickpeas → more chews = faster satiety signal to brain .
    • Glass-of-water rule: 250 mL before meals → gastric stretch → 8 % kcal reduction .

    4. Macro Timing Cheat-Sheet

    • Breakfast: 25 g protein within 30 min of waking → halves mid-morning cravings.
      Example: overnight oats + 2 tbsp PB + chia + berries = 28 g P, 10 g F, 8 g fibre.
    • Every 3 h: 15 g protein + 5 g fibre snack → prevents energy dip.
      Example: edamame pouch + mandarin.
    • Last meal: ≥ 10 g fibre + 20 g protein → overnight glucose stability → better sleep quality .

    5. 5-Day Satiety Menu (≤ $2 per meal)

    DayBreakfast (25 g P)Lunch (30 g P)Dinner (35 g P)Snack (15 g P)Cost
    MonOvernight oats PB chiaLentil-quinoa soupBlack-bean sweet-potato chiliRoasted chickpeas$1.90
    TueTofu-scramble wrapChickpea-avocado saladPeanut soba stir-fryEdamame pouch$2.10
    WedChia-pudding berriesBroccoli-edamame soupTofu-veg udonApple + PB$1.85
    ThuOat-chia energy ballQuinoa-edamame bowlLentil curry + riceCocoa-oat ball$1.95
    FriPB-banana toastSweet-potato lentil soupTofu stir-fry brown riceWatermelon + nutritional yeast$2.00

    Average: $1.96/day = < $60/month—cheaper than one café muffin.


    6. Sensory & Mindful Tricks

    • Eat with chopsticks → 15 % slower intake = earlier satiety signal.
    • Plate colour contrast: red bowl for green salad → visual appetite appeal.
    • Aroma pre-load: sniff citrus peel before meals → vagal stimulation → earlier fullness .

    7. Common Pitfalls (Even Vegan)

    • Smoothie-only breakfast → zero chew-time → hunger 90 min later. Fix: add 2 tbsp oats or chia + chew a few nuts.
    • “Coconut-milk everything” → 400 kcal from fat, zero chew. Fix: light coconut milk or cashew cream.
    • Under-salting → bland = over-eat later. Fix: ½ tsp salt per 4 cups broth.

    8. Quick FAQ

    Q1. Do I need to count macros forever?
    A: No – hit the 5-pillar formula 3 days in a row; most people feel “3-hour fullness” by day 3 .

    Q2. Can I just drink more smoothies?
    A: Blend then chew something (e.g., 2 walnuts) → jaw activation doubles satiety hormone release .

    Q3. Are plant proteins “incomplete”?
    A: Myth – mix legumes + whole grains in 24 h → complete amino pool; lentils + oats = 3:1 leucine:lysine ideal ratio.


    Key Take-away

    Build every meal around:

    1. 25 g plant protein
    2. 10 g fibre
    3. 1 glass water
    4. Chew-factor (raw veg or nuts)
    5. Mindful 20 min

    Do this 3 days straight → stable glucose, 4–5 h fullness, 22 % less evening snacking .

    #howtobuildmuscleonaplantbaseddiet
    #antianxietyfoods
    #proteinintaketiming
    #timingofproteinintake
    #timingproteinintake
    #nutritionalcausesofconstantfatigue
    #nourishnookmeaning

  • Intra-Workout Vegan Fuel Ideas — Nutrition Focused

    Intra-Workout Vegan Fuel Ideas — Nutrition Focused

    Stay powerful between warm-up and cool-down—no whey, no crash, no $5 bar required.


    1. The 60-Minute Rule

    • Sessions ≤ 60 min: water + electrolyte stick (Na 200 mg/K 400 mg) only.
    • > 60 min OR high heat/humidity: add 20–40 g fast carbs + 5–10 g amino acids every 30 min.

    2. Vegan Intra-Workout “Toolbox” (TSA-safe, 1-quart bag)

    ItemDoseWhy it worksTSA hack
    Unflavoured BCAA stick8 g EAA (2:1:1)Fermented, complete amino pool → delays muscle breakdownDrop into 500 mL water bottle after security
    Medjool dates ×232 g carbsHigh-GI refill; potassium → cramp preventionStuff into biltong pocket for sweet-salt combo
    Roasted chickpeas 40 g8 g protein + 6 g fibreSustained glucose curve; crunch = satietyPre-portioned in 50 mL screw-top
    Electrolyte stickNa 200 mg/K 400 mgPrevents “plane-headache”-like gym headacheAdd to water every 30 min
    Dark-chocolate square 10 g200 mg theobromineSmooth vasodilation > caffeine jittersLet melt on tongue = slow release
    Dehydrated mango 20 g16 g carbs + vit-CImmune defence in dry gym airRe-hydrate in water bottle = impromptu fruit cup
    Instant oats sachet20 g carbs + 4 g fibreβ-glucan → gut-ATP; fills 200 kcal gapAsk gym hot-water kettle → 90 s microwave
    Coconut-water tetra 250 mL10 g carbs + 470 mg KNatural isotonic ratio; no added sugarBuy post-security or bring empty collapsible bottle

    3. 15-Minute “Hotel-Room” Intra-Bottle (0 equipment)

    • 500 mL water
    • 1 BCAA stick (8 g EAA)
    • 2 Medjool dates (pitted)
    • ¼ tsp salt + squeeze lemon
      Shake = 32 g carbs, 8 g amino acids, 470 mg K, 160 kcal
      Cost: $0.80; prep time: 60 s.

    4. Gym-Bar Hack (when you forgot everything)

    Choose:

    • Banana + cheese stick (if vegetarian) = 25 g carbs + 8 g protein
    • Roasted chickpea pouch + apple = 25 g carbs + 8 g protein
    • Unsalted popcorn 2 cups + BCAA stick in water = 20 g carbs + 8 g protein

    Skip: yogourt-covered pretzels (42 g sugar), mega muffins (500 kcal, 40 g fat), sweetened coffee bottles (48 g sugar).


    5. Vegan “Intra-Gel” Copy-Cat (make 8 for $3)

    • Base: 100 mL apple juice + 1 tsp agar-agar
    • Carbs: 22 g from juice
    • Aminos: 1 scoop vegan BCAA (8 g)
    • Electrolytes: ⅛ tsp salt + ⅛ tsp potassium salt
      Simmer 2 min, pour into 8 silicon mini-moulds, chill.
      Nutrition per 25 mL gel: 22 g carbs, 1 g EAA, 160 mg Na, 90 mg K – isotonic, vegan, no gelatine.

    6. Timing Cheat-Sheet

    • T-0 min (start of session): sip 250 mL electrolyte water
    • Every 30 min: 20–40 g carbs + 5–10 g amino acids (≈ 150 kcal)
    • Last 15 min: stop solids, finish liquids → prevents post-workout bloat

    7. Climate Tweaks

    • Hot & humid: double electrolyte stick (Na 400 mg/K 800 mg) → prevents cramp.
    • Cold/dry gym: add ½ tsp coconut oil to bottle → MCT for steady burn.

    8. Quick FAQ

    Q1. Do I need intra-workout if I eat a good breakfast?
    A: ≤ 60 min sessions = no. > 60 min or fasted = yes, aim for 30–60 g carbs/hour.

    Q2. Can I just use water?
    A: Water + electrolytes is fine for < 60 min; add carbs if you feel energy dip or sweat heavily.

    Q3. Are BCAA sticks worth it?
    A: Yes – 8 g fermented BCAA costs $0.30 and halves muscle-breakdown markers vs. carbs alone .


    Key Take-away

    Pack water + electrolyte + fast carb + vegan amino in a single bottle; sip every 30 min, and you’ll finish the session as energetically as you started—without bankrupting your travel fund.

    #howtobuildmuscleonaplantbaseddiet
    #antianxietyfoods
    #proteinintaketiming
    #timingofproteinintake
    #timingproteinintake
    #nutritionalcausesofconstantfatigue
    #nourishnookmeaning

  • Protein-Rich Veggie Stir-Frys — Nutrition Focused

    Protein-Rich Veggie Stir-Frys — Nutrition Focused

    Eat like a plant-based athlete: 25 g+ of complete protein, 8 g+ fibre, <$2 a bowl, and zero kitchen gadgets.


    1. The 25 g Plant-Protein Formula

    Dry legumes 1 cup + whole-grain ½ cup + nut/seed cream ¼ cup + rainbow veg + umami sauce = 25–30 g complete protein per 400 kcal bowl.


    2. Pantry Power-Staples (USA 2025 prices)

    IngredientProtein/100 gCost/20 g proteinSuper-power
    Red lentils (dry)25 g$0.1290 s cook-time, folate ↑ serotonin
    Black beans (dry)21 g$0.10Resistant starch → butyrate → gut-ATP
    Chickpeas (dry)19 g$0.15Isoflavones → anti-inflammatory
    Frozen edamame13 g$0.40Complete amino acid profile
    Quinoa (dry)14 g$0.25Magnesium → nerve conduction
    Peanut butter (natural)25 g$0.22Arginine → blood-flow
    Cashew pieces18 g$0.35Cream base → silky mouth-feel
    Nutritional yeast45 g$0.18B₁₂ fortified → energy metabolism

    3. Five 15-Minute Stir-Fry Templates

    Each = 4 bowls, 25–30 g protein, 8 g fibre, <$2/bowl, 1 pan.

    #1 Golden Lentil-Quinoa Stir-Fry (28 g protein)

    Ingredients

    • 1 cup red lentils (dry)
    • ½ cup quinoa (dry)
    • 1 carrot, 1 onion, 2 cloves garlic (minced)
    • 1 tbsp curry powder
    • 4 cups veg broth
    • ¼ cup cashew cream (blend ¼ cup cashews + ¾ cup water)
    • 1 tsp turmeric + black pepper

    Method

    1. Sauté onion/carrot/garlic 3 min.
    2. Add spices, lentils, quinoa, broth → boil 12 min.
    3. Stir in cashew cream → simmer 2 min.
    4. Finish with lemon juice.

    Macros per bowl: 28 g protein, 8 g fibre, 420 kcal, $1.20


    #2 Black-Bean Sweet-Potato Chili (25 g protein)

    Ingredients

    • 1 cup dry black beans (soaked overnight)
    • 1 medium sweet potato (diced)
    • 1 cup frozen corn
    • 1 can diced tomatoes
    • 1 tbsp smoked paprika + cumin
    • 4 cups veg broth
    • 2 tbsp peanut butter (secret creaminess)

    Method: Dump everything in pot → simmer 35 min → blend ½ for texture.

    Macros per bowl: 25 g protein, 12 g fibre, 445 kcal, $1.10


    #3 Creamy Broccoli-Edamame Stir-Fry (22 g protein)

    Ingredients

    • 12 oz frozen broccoli
    • 1 cup frozen shelled edamame
    • 1 small potato (diced)
    • ¼ cup nutritional yeast
    • 3 cups veg broth
    • 1 tbsp miso (stir in last)

    Method: Boil veggies 12 min → blend with yeast & miso → serve.

    Macros per bowl: 22 g protein, 9 g fibre, 274 kcal, $1.35


    #4 Peanut-Coconut Soba Stir-Fry (26 g protein)

    Ingredients

    • 200 g dry soba (buckwheat)
    • 1 cup red lentils
    • 1 can light coconut milk
    • 2 tbsp peanut butter
    • 1 tbsp red curry paste
    • 4 cups veg broth
    • 1 cup frozen green beans

    Method: Boil lentils 10 min → add noodles, veg, coconut milk, PB, curry → simmer 8 min.

    Macros per bowl: 26 g protein, 7 g fibre, 450 kcal, $1.45


    #5 Tofu-Veggie Udon Stir-Fry (24 g protein)

    Ingredients

    • 16 oz extra-firm tofu (cubed)
    • 200 g dry udon
    • 2 cups frozen mixed veg
    • 2 tbsp soy sauce
    • 1 tbsp sesame oil
    • 1 tsp garlic powder + ginger
    • 2 tbsp peanut butter (creamy)

    Method: Pan-fry tofu 5 min → boil noodles → toss everything → finish with PB sauce.

    Macros per bowl: 24 g protein, 6 g fibre, 440 kcal, $1.50


    4. Texture & Flavour Shortcuts

    • Cream without dairy: blend ¼ cup cashews + ¾ cup water → pour last 2 min.
    • Umami bomb: 1 tsp miso or 1 tbsp nutritional yeast stirred off-heat.
    • Spice layers: toast cumin & paprika 30 s before liquids → depth without salt.
    • Colour pop: frozen spinach or roasted red peppers → visual appetite appeal.

    5. Cook-Once, Eat-All-Week Storage

    • Fridge: 5 days in glass jars; cool completely before sealing.
    • Freezer: portion into silicone muffin trays → pop out 200 kcal pucks → store 3 months.
    • Reheat: add splash water + microwave 90 s or stovetop 3 min; stir for even heat.

    6. Budget & Planet Impact

    • Average cost: $1.10–$1.50 per 400 kcal bowl = < $10 for 5 meals.
    • Carbon footprint: plant-based soups emit 0.8 kg CO₂-eq per meal vs 3.9 kg for beef stir-fry .

    7. Common Pitfalls (Even Vegan)

    • Coconut-milk heavy → 400 kcal from fat, lethargy 2 h later – use light coconut milk or cashew cream.
    • Under-salting → bland = over-eat later; add ½ tsp salt per 4 cups broth.
    • No citrus finish → iron absorption drops 50 %; squeeze lemon before serving.

    8. Quick FAQ

    Q1. Do I need a wok?
    A: No – 12-inch skillet works; just don’t crowd the pan.

    Q2. Can I use canned beans?
    A: Yes – 3 cans = 1 cup dry; rinse to cut 40 % sodium; add last 5 min to avoid mush.

    Q3. How long before I feel more energy?
    A: 72 h of ≥ 30 g fibre + 25 g protein breakfasts → stable glucose curve, subjectively “flatter” energy by day 3.


    Key Take-away

    Beans + whole grains + nut/seed cream + spice = 25 g protein, 8 g fibre, <$1.50, 15 min cook-time.
    Batch on Sunday, portion into jars, and you’ve got a jet-lag-proof, budget-proof energy source all week.


    #howtobuildmuscleonaplantbaseddiet
    #antianxietyfoods
    #proteinintaketiming
    #timingofproteinintake
    #timingproteinintake
    #nutritionalcausesofconstantfatigue
    #nourishnookmeaning

  • The Beauty of a Woman’s Joy Eating Watermelon on a Roof — Nutrition Focused

    The Beauty of a Woman’s Joy Eating Watermelon on a Roof — Nutrition Focused


    Description : Discover the science, styling and photography behind the beauty of a woman’s joy eating watermelon on a roof—sunshine, juice, and free preset.


    TABLE OF CONTENTS

    1. Why Rooftop + Watermelon + Joy = Algorithm Gold
    2. The Neuroscience of Juicy Joy: Dopamine, Vasodilation & Micro-Expression
    3. Watermelon Physics: Juice Viscosity, Seed Scatter & Sunlight Glow
    4. Rooftop Logistics: Sun Angle, Wind, Safety & Urban Background
    5. Location Scouting: City Rooftop, Barn Roof or Beach Shack Terrace
    6. Wardrobe & Beauty: Linen Dresses, Sun-Hats & Dewy Sun-Kissed Skin
    7. Gear Guide: Weather-Sealed Cameras, Macro Lenses & Reflectors for Sun
    8. 20 Posing Tricks for Effortless “Rooftop-Joy” Magic
    9. Lighting Mastery: Back-Light for Juice Glow, Side-Light for Skin Sheen
    10. Colour Palette: Watermelon Pink, Sky Blue, Cream Linen & Gold Sun
    11. Post-Production: Lightroom Recipe for Golden Skin & Juice Pop
    12. Micro-Storytelling: Captions That Taste Like Summer Dawn
    13. Platform Hacks: Instagram Reels, Pinterest Pins & TikTok Juice-Loops
    14. Health & Safety: Food-Safe Watermelon, Roof Safety & Sun Protection
    15. FAQ (Google People-Also-Ask)
    16. Final Bite: Key Takeaways + Free Cheat-Sheet Download

    1. Why Rooftop + Watermelon + Joy = Algorithm Gold

    Rooftop shots average 5.8 sec view-time; add juicy joy and retention jumps to 10.2 sec—algorithm gold.


    2. The Neuroscience of Juicy Joy: Dopamine, Vasodilation & Micro-Expression

    Watermelon aroma + cold juice triggers dopamine 12 %; capture the micro-second eye-closed smile for authentic joy.


    3. Watermelon Physics: Juice Viscosity, Seed Scatter & Sunlight Glow

    • Juice: viscosity 1 cP at 5 °C – perfect 2-second drip.
    • Seeds: visible scatter acts as natural “confetti” under side-light.
    • Glow: lycopene-rich flesh reflects 5600 K sunlight = natural golden-hour.

    4. Rooftop Logistics: Sun Angle, Wind, Safety & Urban Background

    • Sun: 45° elevation = back-light juice glow; shoot 2 h after sunrise.
    • Wind: > 15 km/h scatters seeds; bring white sheet as windbreak.
    • Safety: parapet ≥ 1 m height; tether gear; non-slip shoes.
    • Background: urban skyline or barn tin – adds texture contrast.

    5. Location Scouting: City Rooftop, Barn Roof or Beach Shack Terrace

    • City: polished concrete reflects sky; request corner spot for side-light.
    • Barn: rusted tin echoes watermelon red; brings pastoral vibe.
    • Beach: sunset at 45° = natural back-light; use driftwood as prop.

    6. Wardrobe & Beauty: Linen Dresses, Sun-Hats & Dewy Sun-Kissed Skin

    • Dress: stone-washed linen in cream – reflects sun without glare.
    • Hat: wide-brim straw – creates dappled light on face.
    • Skin: mist with thermal water – catches back-light particles.

    7. Gear Guide: Weather-Sealed Cameras, Macro Lenses & Reflectors for Sun

    • Body: Sony A7 IV – weather-sealed, IBIS.
    • Lens: 35 mm f/1.4 for storytelling; 90 mm macro f/2.8 for seed detail.
    • Reflector: gold/silver – bounce fill onto face.
    • Tether: peak-design leash – safety on roof edges.

    8. 20 Posing Tricks for Effortless “Rooftop-Joy” Magic

    1. Sit on roof edge, legs dangling – urban vibe.
    2. Hold watermelon wedge with both hands – triangular frame.
    3. Bite gently – shoot 10 fps burst for juice drip.
    4. Close-up: juice on cheek.
    5. Overhead: face forming heart around wedge.
    6. Side-profile: eyelashes reflected in juice.
    7. Use pinky to steady wedge – delicate grip.
    8. Reflection shot: mirrored sunglasses doubling sky.
    9. Slow-motion: iPhone 240 fps on juice drip.
    10. ASMR: record soft crunch bite.
    11. Hand-to-cheek sigh – satisfaction.
    12. Empty rind shot – story arc complete.
    13. Sun-flare behind – warm halo on hair.
    14. Shoot through juice for foreground bokeh.
    15. Macro: seed on lip – playful.
    16. Shoot at f/2.8 – isolate face against creamy bokeh.
    17. Sun-flare – dynamic light on juice.
    18. Capture yawn after sugar – calming effect.
    19. Final smile at camera – invitation to viewer.
    20. Safety shot: feet on roof edge – closure.

    9. Lighting Mastery: Back-Light for Juice Glow, Side-Light for Skin Sheen

    • Back-light: sunset at 45° – juice glows like liquid sun.
    • Side-light: gold reflector at 45° – skin sheen without hotspots.
    • Bounce: white sheet – soft fill on laugh lines.

    10. Colour Palette: Watermelon Pink, Sky Blue, Cream Linen & Gold Sun

    Adobe Color rule: triadic. Base #FF6B6B (watermelon), accent #87CEEB (sky), pop #FFD700 (sun). Avoid pure white – it clips under sun.


    11. Post-Production: Lightroom Recipe for Golden Skin & Juice Pop

    1. Basic: Temp +5, Tint +3, Exposure +0.20, Highlights −15, Shadows +20, Whites −8, Blacks +5.
    2. HSL: Orange Luminance +10 (skin), Red Saturation +6 (watermelon).
    3. Color-Grading: Midtones 45° 5/5, Shadows 210° 3/10.
    4. Mask (skin): clarity −5, texture +4.
    5. Mask (juice): texture +8, dehaze +3.
    6. Grain: 10/25 for subtle film feel.

    12. Micro-Storytelling: Captions That Taste Like Summer Dawn

    Formula: [Sun verb] + [watermelon descriptor] + emotional metaphor + CTA]
    Example: “The sun drips onto the melon like liquid dawn, her smile spills like summer. Save this if you’ve ever tasted sky.”


    13. Platform Hacks: Instagram Reels, Pinterest Pins & TikTok Juice-Loops

    • IG Reel: 9:16, 0.5 s macro clips + ASMR crunch.
    • Pinterest: 2:3 vertical, overlay “Rooftop-Joy Magic” in Raleway Light.
    • TikTok: use trending “juice” audio, 240 fps slow-mo on drip break.

    14. Health & Safety: Food-Safe Watermelon, Roof Safety & Sun Protection

    • Watermelon: chill 4 h pre-shoot for juice control; pat dry for grip.
    • Roof: parapet ≥ 1 m; tether gear; non-slip shoes.
    • Sun: SPF 30+; shoot 2 h post-sunrise to avoid glare.

    15. FAQ

    Q1. Which watermelon photographs best?
    A: Seed-in, deep red flesh – seeds act as natural confetti under light.

    Q2. How do you keep juice from dripping too fast?
    A: Chill 4 h; pat dry; drizzle 2 mL at a time with pipette.

    Q3. Does sun damage watermelon?
    A: No – 2 h shoot window; mist to prevent dehydration.


    16. Final Bite: Key Takeaways + Free Cheat-Sheet

    • Chill seed-in watermelon for juice control; shoot 2 h post-sunrise.
    • Back-light at 45° for juice glow, gold reflector for skin fill.
    • Wardrobe in cream linen, straw hat, thermal water mist.
    • +10 orange luminance, +6 red saturation, −5 skin clarity.

    .

    #howtobuildmuscleonaplantbaseddiet
    #antianxietyfoods
    #proteinintaketiming
    #timingofproteinintake
    #timingproteinintake
    #nutritionalcausesofconstantfatigue
    #nourishnookmeaning

  • The Beauty of a Woman’s Toes Curling at Wasabi Kick — Nutrition Focused

    The Beauty of a Woman’s Toes Curling at Wasabi Kick — Nutrition Focused

    Description : Discover the science, styling and photography behind the beauty of a woman’s toes curling at wasabi kick—spice, motion and free preset.


    TABLE OF CONTENTS

    1. Why Wasabi Kick + Toe Curl + Feminine Reaction = Algorithm Gold
    2. The Neuroscience of Spice: TRPV1 Receptors, Adrenaline & Micro-Motion
    3. Wasabi vs. Chili: Allyl Isothiocyanate vs. Capsaicin Kick Dynamics
    4. Foot Anatomy for Photographers: Arch Curve, Toe Spread & Skin Tone
    5. Location Scouting: Sushi Bar, Tatami Room or Outdoor Picnic Mat
    6. Wardrobe & Beauty: Pedicure Polish, Anklets & Dewy Post-Kick Skin
    7. Gear Guide: High-FPS Cameras, Macro Lenses & Continuous Lights for Motion
    8. 20 Posing Tricks for Effortless “Wasabi-Toe” Magic
    9. Lighting Mastery: Back-Light for Skin Glow, Side-Light for Toe Shadow
    10. Colour Palette: Wasabi Green, Cream Skin, Dark Wood & Gold Accent
    11. Post-Production: Lightroom Recipe for Golden Skin & Green Pop
    12. Micro-Storytelling: Captions That Taste Like Mountain Fire
    13. Platform Hacks: Instagram Reels, Pinterest Pins & TikTok Curl-Loops
    14. Health & Safety: Food-Safe Wasabi, Skin Sensitivity & Easy Clean-Up
    15. FAQ (Google People-Also-Ask)
    16. Final Curl: Key Takeaways + Free Cheat-Sheet Download

    1. Why Wasabi Kick + Toe Curl + Feminine Reaction = Algorithm Gold

    Spice-reaction videos average 6.3 sec view-time; add toe-curl micro-motion and retention jumps to 10.1 sec—algorithm gold.


    2. The Neuroscience of Spice: TRPV1 Receptors, Adrenaline & Micro-Motion

    Wasabi activates TRPV1 receptors → adrenaline spike 14 % within 3 seconds; toe curl is autonomic micro-expression—capture for authentic reaction.


    3. Wasabi vs. Chili: Allyl Isothiocyanate vs. Capsaicin Kick Dynamics

    • Wasabi: allyl isothiocyanate – vapour-based, peaks at 15 s, fades by 60 s – perfect for single-take filming.
    • Chili: capsaicin – oil-based, lingers 10+ min – harder to control for repeat shots.
    • Choice: real wasabi paste (or high-grade horseradish) for authentic vapour kick.

    4. Foot Anatomy for Photographers: Arch Curve, Toe Spread & Skin Tone

    • Arch: lateral light at 45° accentuates curve = elegant line.
    • Toes: second toe slightly longer = classical proportion; curl creates dynamic triangle.
    • Skin: warm undertone (MAC NC25 range) harmonises with wasabi green.

    5. Location Scouting: Sushi Bar, Tatami Room or Outdoor Picnic Mat

    • Sushi bar: polished floor reflects toes; request corner spot for side-light.
    • Tatami room: natural bamboo texture echoes wasabi origin; bring low table for height.
    • Outdoor picnic: sunset at 45° = natural back-light; use white sheet as scrim.

    6. Wardrobe & Beauty: Pedicure Polish, Anklets & Dewy Post-Kick Skin

    • Polish: sheer nude or soft gold – catches candlelight without competing with green.
    • Anklet: thin gold chain – echoes wasabi tone, draws eye to ankle.
    • Skin: mist with thermal water – catches back-light particles.

    7. Gear Guide: High-FPS Cameras, Macro Lenses & Continuous Lights for Motion

    • Body: Sony A7 IV – 10 fps burst, silent shutter.
    • Lens: 35 mm f/1.4 for storytelling; 90 mm macro f/2.8 for toe curl detail.
    • Light: Aputure 60× at 10 % 3200 K – warm key without overheating wasabi.
    • Wasabi: real paste in porcelain dish – authentic vapour.

    8. 20 Posing Tricks for Effortless “Wasabi-Toe” Magic

    1. Sit cross-legged, bowl below eye level – natural curl angle.
    2. Hold chopsticks with wasabi – elegant grip.
    3. Micro-brow raise – anticipation cue.
    4. Shoot 10 fps during bite – one frame captures perfect curl.
    5. Close-up: toe curl close-up.
    6. Overhead: feet forming heart around bowl.
    7. Side-profile: eyelashes reflected in bowl.
    8. Use pinky to steady bowl – delicate grip.
    9. Reflection shot: mirrored spoon doubling scene.
    10. Slow-motion: iPhone 240 fps on toe curl.
    11. ASMR: record soft wasabi crunch.
    12. Hand-to-foot sigh – satisfaction.
    13. Empty bowl shot – story arc complete.
    14. Candle nearby – warm color contrast.
    15. Shoot through wasabi steam for foreground bokeh.
    16. Macro: wasabi grain on toe – playful.
    17. Shoot at f/2.8 – isolate toes against creamy bokeh.
    18. Candle flicker – dynamic light on arch.
    19. Capture yawn after kick – calming effect.
    20. Final smile at camera – invitation to viewer.

    9. Lighting Mastery: Back-Light for Skin Glow, Side-Light for Toe Shadow

    • Back-light: 3200 K LED – skin glows like amber.
    • Side-light: candle at 45° – toe shadow without hotspots.
    • Bounce: white card – soft fill on arch.

    10. Colour Palette: Wasabi Green, Cream Skin, Dark Wood & Gold Accent

    Adobe Color rule: triadic. Base #7CFC00 (wasabi), accent #F5DEB3 (skin), pop #FFD700 (gold). Avoid pure white – it clips under warm light.


    11. Post-Production: Lightroom Recipe for Golden Skin & Green Pop

    1. Basic: Temp +5, Tint +3, Exposure +0.20, Highlights −15, Shadows +20, Whites −8, Blacks +5.
    2. HSL: Orange Luminance +10 (skin), Green Saturation +6 (wasabi).
    3. Color-Grading: Midtones 45° 5/5, Shadows 210° 3/10.
    4. Mask (skin): clarity −5, texture +4.
    5. Mask (wasabi): texture +8, dehaze +3.
    6. Grain: 10/25 for subtle film feel.

    12. Micro-Storytelling: Captions That Taste Like Mountain Fire

    Formula: [Spice verb] + [wasabi descriptor] + emotional metaphor + CTA]
    Example: “The wasabi lands like green lightning, her toes bloom like mountain flowers. Save this if you’ve ever danced with fire.”


    13. Platform Hacks: Instagram Reels, Pinterest Pins & TikTok Curl-Loops

    • IG Reel: 9:16, 0.5 s macro clips + ASMR crunch.
    • Pinterest: 2:3 vertical, overlay “Wasabi-Toe Magic” in Raleway Light.
    • TikTok: use trending “spice” audio, 240 fps slow-mo on toe curl.

    14. Health & Safety: Food-Safe Wasabi, Skin Sensitivity & Easy Clean-Up

    • Wasabi: real paste (or high-grade horseradish) – avoid neon-dyed fake.
    • Skin: rinse within 30 min; wasabi is slightly alkaline (pH 7.2) – no stain.
    • Clean-up: warm water + mild soap; oil pre-coat prevents dryness.

    15. FAQ

    Q1. Is wasabi safe for skin contact?
    A: Yes – rinse within 30 min; avoid open cuts (temporary sting).

    Q2. Which wasabi photographs best?
    A: Real wasabi paste – pale green + visible grain; avoid neon-dyed fake.

    Q3. Does candlelight damage wasabi?
    A: No – 30 cm distance; wasabi is root-based, won’t wilt.


    16. Final Curl: Key Takeaways + Free Cheat-Sheet

    • Use real wasabi paste for pale green + visible grain.
    • Back-light at 3200 K for skin glow, side-light for toe shadow.
    • Wardrobe in nude polish, gold anklet, thermal water mist.
    • Edit: +10 orange luminance, +6 green saturation, −5 skin clarity.


    #howtobuildmuscleonaplantbaseddiet
    #antianxietyfoods
    #proteinintaketiming
    #timingofproteinintake
    #timingproteinintake
    #nutritionalcausesofconstantfatigue
    #nourishnookmeaning

  • The Beauty of a Woman’s Concentration Peeling a Mandarin — Nutrition Focused

    The Beauty of a Woman’s Concentration Peeling a Mandarin — Nutrition Focused

    Description: Discover the science, styling, and photography behind the beauty of a woman’s concentration peeling a mandarin. It involves focus, citrus, and a free preset.


    TABLE OF CONTENTS

    1. Why Mandarin + Concentration + Feminine Focus = Algorithm Gold
    2. The Neuroscience of Concentration: Alpha Waves, Micro-Expressions & Mirror Neurons
    3. Mandarin Anatomy: Peel Texture, Oil Glands & Citrus Aroma Release
    4. Hand Anatomy for Photographers: Knuckle Wrinkles, Nail Shape & Skin Tone
    5. Location Scouting: Sunlit Kitchen, Orchard Picnic or Train Window Seat
    6. Wardrobe & Beauty: Linen Dresses, Nail Colour & Dewy Citrus-Kissed Skin
    7. Gear Guide: High-FPS Cameras, Macro Lenses & Continuous Lights for Motion
    8. 20 Posing Tricks for Effortless “Mandarin-Focus” Magic
    9. Lighting Mastery: Back-Light for Peel Glow, Side-Light for Oil Sheen
    10. Colour Palette: Mandarin Orange, Cream Linen, Aged Wood & Olive Green
    11. Post-Production: Lightroom Recipe for Porcelain Skin & Citrus Pop
    12. Micro-Storytelling: Captions That Smell Like Winter Orchards
    13. Platform Hacks: Instagram Reels, Pinterest Pins & TikTok Peel-Loops
    14. Health & Safety: Food-Safe Citrus, Skin pH & Easy Clean-Up
    15. FAQ (Google People-Also-Ask)
    16. Final Peel: Key Takeaways + Free Cheat-Sheet Download

    1. Why Mandarin + Concentration + Feminine Focus = Algorithm Gold

    Close-up hand shots average 4.3 sec view-time; add citrus aroma + micro-concentration and retention jumps to 8.6 sec—algorithm gold.


    2. The Neuroscience of Concentration: Alpha Waves, Micro-Expressions & Mirror Neurons

    Concentration tasks increase alpha waves 12 %; viewers subconsciously mirror the focused state, boosting engagement 24 %.


    3. Mandarin Anatomy: Peel Texture, Oil Glands & Citrus Aroma Release

    • Peel: oil glands visible as white dots; rupture releases limonene → instant mood lift.
    • Texture: slightly bumpy = tactile interest; lateral light accentuates pores.
    • Colour: anthocyanin-rich skins (blood orange) yield deep ruby – pairs with cream.

    4. Hand Anatomy for Photographers: Knuckle Wrinkles, Nail Shape & Skin Tone

    • Knuckles: 45° side-light accentuates gentle wrinkles = texture story.
    • Nails: short, clear buff – prevents colour competition with orange.
    • Skin: warm undertone (MAC NC25 range) harmonises with mandarin.

    5. Location Scouting: Sunlit Kitchen, Orchard Picnic or Train Window Seat

    • Kitchen: north-facing window = soft, even light; marble counter bounces fill.
    • Orchard: living leaves echo mandarin origin; bring white sheet as reflector.
    • Train: window seat at sunset = natural back-light; use jacket as scrim.

    6. Wardrobe & Beauty: Linen Dresses, Nail Colour & Dewy Citrus-Kissed Skin

    • Dress: stone-washed linen in ecru – reflects fill without colour cast.
    • Nails: sheer nude gloss – catches catch-light without stealing focus.
    • Skin: mist with thermal water – catches back-light particles.

    7. Gear Guide: High-FPS Cameras, Macro Lenses & Continuous Lights for Motion

    • Body: Sony A7 IV – 10 fps burst, silent shutter.
    • Lens: 90 mm macro f/2.8 for 1:1 oil gland detail; 50 mm f/1.4 for storytelling.
    • Light: Aputure 60× at 10 % 5600 K – daylight-balanced without overheating peel.
    • Tweezers: bamboo – avoids bruising fruit.

    8. 20 Posing Tricks for Effortless “Mandarin-Focus” Magic

    1. Sit sideways, mandarin on knee – triangular composition.
    2. Start at stem – thumbnail breaks skin – shoot 10 fps burst.
    3. Micro-bite lower lip – concentration cue.
    4. Peel spiral downward – capture 360° motion.
    5. Close-up: oil gland close-up.
    6. Overhead: hands forming heart around mandarin.
    7. Side-profile: eyelashes reflected in peel.
    8. Use pinky to steady fruit – delicate grip.
    9. Reflection shot: mirrored spoon doubling scene.
    10. Slow-motion: iPhone 240 fps on peel spiral.
    11. ASMR: record soft peel crackle.
    12. Hand-to-chest sigh – satisfaction.
    13. Empty peel shot – story arc complete.
    14. Candle nearby – warm color contrast.
    15. Shoot through peel for foreground bokeh.
    16. Macro: oil droplet on fingernail – playful.
    17. Shoot at f/2.8 – isolate hands against creamy bokeh.
    18. Candle flicker – dynamic light on peel.
    19. Capture yawn after citrus – calming effect.
    20. Final smile at camera – invitation to viewer.

    9. Lighting Mastery: Back-Light for Peel Glow, Side-Light for Oil Sheen

    • Back-light: 5600 K LED – peel glows like amber.
    • Side-light: candle at 45° – oil sheen without hotspots.
    • Bounce: white card – soft fill on hands.

    10. Colour Palette: Mandarin Orange, Cream Linen, Aged Wood & Olive Green

    Adobe Color rule: analogous. Base #FFA500 (mandarin), accent #F5DEB3 (linen), pop #556B2F (olive). Avoid pure white – it clips under warm light.


    11. Post-Production: Lightroom Recipe for Porcelain Skin & Citrus Pop

    1. Basic: Temp +5, Tint +3, Exposure +0.20, Highlights −15, Shadows +20, Whites −8, Blacks +5.
    2. HSL: Orange Luminance +10 (skin), Orange Saturation +6 (mandarin).
    3. Color-Grading: Midtones 45° 5/5, Shadows 210° 3/10.
    4. Mask (skin): clarity −5, texture +4.
    5. Mask (peel): texture +8, dehaze +3.
    6. Grain: 10/25 for subtle film feel.

    12. Micro-Storytelling: Captions That Smell Like Winter Orchards

    Formula: [Citrus verb] + [concentration descriptor] + emotional metaphor + CTA]
    Example: “The mandarin sighs under her thumbnail, winter oil spilling like liquid sunrise. Save this if you’ve ever tasted focus.”


    13. Platform Hacks: Instagram Reels, Pinterest Pins & TikTok Peel-Loops

    • IG Reel: 9:16, 0.5 s macro clips + ASMR peel.
    • Pinterest: 2:3 vertical, overlay “Mandarin Focus Magic” in Raleway Light.
    • TikTok: use trending “peel” audio, 240 fps slow-mo on spiral.

    14. Health & Safety: Food-Safe Citrus, Skin pH & Easy Clean-Up

    • Citrus: organic, unwashed until shoot – avoids white bloom loss.
    • Skin pH: rinse within 30 min; citrus oil is slightly acidic (pH 3.5).
    • Clean-up: warm water + mild soap; oil pre-coat prevents stain.

    15. FAQ (Google People-Also-Ask)

    Q1. Which mandarin photographs best?
    A: Blood orange – deep ruby skin + orange flesh = colour pop.

    Q2. How do you keep mandarin from drying under lights?
    A: Mist with water every 5 min; shoot within 20 min of peel start.

    Q3. Does candlelight damage mandarin?
    A: No – 30 cm distance; mist to prevent dehydration.


    16. Final Peel: Key Takeaways + Free Cheat-Sheet

    • Use blood orange for deep ruby skin + orange flesh colour pop.
    • Back-light at 5600 K for peel glow, side-light for oil sheen.
    • Wardrobe in ecru linen, nude gloss, thermal water mist.
    • Edit: +10 orange luminance, +6 orange saturation, −5 skin clarity.

    #howtobuildmuscleonaplantbaseddiet
    #antianxietyfoods
    #proteinintaketiming
    #timingofproteinintake
    #timingproteinintake
    #nutritionalcausesofconstantfatigue
    #nourishnookmeaning

  • A Woman’s Beauty in the Drizzle of Chocolate on Her Cheek

    A Woman’s Beauty in the Drizzle of Chocolate on Her Cheek


    SEO Blueprint at a Glance


    Description: Discover the science behind a woman’s beauty. It’s in the drizzle of chocolate on her cheek—drip motion and emotion. Enjoy a free preset.


    TABLE OF CONTENTS

    1. Why Chocolate-Drizzle + Cheek + Feminine Grace = Algorithm Gold
    2. The Neuroscience of a Drizzle: Dopamine, Tactile Mirror Neurons & Micro-Expression
    3. Chocolate Physics: Viscosity, Temperature & Drip Duration
    4. Cheek Anatomy for Photographers: Skin Texture, Light Scatter & Colour Cast
    5. Location Scouting: Patisserie Counter, Candlelit Table or Outdoor Dessert Picnic
    6. Wardrobe & Beauty: Satin Blouses, Lip Gloss & Dewy Chocolate-Kissed Skin
    7. Gear Guide: High-FPS Cameras, Macro Lenses & Continuous Lights for Motion
    8. 20 Posing Tricks for Effortless “Chocolate-Drizzle” Magic
    9. Lighting Mastery: Back-Light for Chocolate Glow, Side-Light for Skin Sheen
    10. Colour Palette: Dark Chocolate, Cream Skin, Gold Accent & Ruby Berry
    11. Post-Production: Lightroom Recipe for Porcelain Skin & Silky Chocolate
    12. Micro-Storytelling: Captions That Taste Like Valentine’s Midnight
    13. Platform Hacks: Instagram Reels, Pinterest Pins & TikTok Drip-Loops
    14. Health & Safety: Food-Safe Chocolate, Skin pH & Easy Clean-Up
    15. FAQ (Google People-Also-Ask)
    16. Final Drizzle: Key Takeaways + Free Cheat-Sheet Download

    1. Why Chocolate-Drizzle + Cheek + Feminine Grace = Algorithm Gold

    Chocolate-drip Reels average 5.2 sec view-time; add cheek close-up and retention jumps to 9.4 sec—algorithm gold.


    2. The Neuroscience of a Drizzle: Dopamine, Tactile Mirror Neurons & Micro-Expression

    Viewing tactile drizzle activates secondary somatosensory cortex—observers “feel” the drip, boosting engagement 26 %.


    3. Chocolate Physics: Viscosity, Temperature & Drip Duration

    • Viscosity: 1 200 cP at 45 °C – perfect 2-second drip.
    • Temperature: 45–50 °C – silky sheen without burn risk.
    • Drip duration: 2–3 seconds under gravity – shoot 10 fps burst.

    4. Cheek Anatomy for Photographers: Skin Texture, Light Scatter & Colour Cast

    • Texture: lateral light at 45° accentuates pores & peach-fuzz = tactile story.
    • Light scatter: dewy skin reflects 6 % more light = natural highlight.
    • Colour cast: chocolate reflects 3200 K candlelight → automatic golden-hour glow.

    5. Location Scouting: Patisserie Counter, Candlelit Table or Outdoor Dessert Picnic

    • Patisserie: glass counter doubles reflection; request corner spot for side-light.
    • Candlelit table: 3 beeswax candles 30 cm from subject → 2200 K key light + chocolate rim.
    • Outdoor picnic: sunset at 45° = natural back-light; bring white sheet as reflector.

    6. Wardrobe & Beauty: Satin Blouses, Lip Gloss & Dewy Chocolate-Kissed Skin

    • Blouse: stone-washed satin in champagne – reflects warm light onto face.
    • Lip gloss: clear with gold micro-shimmer – catches chocolate glow.
    • Skin: dab highlighter on cheekbones – catches drizzle reflection.

    7. Gear Guide: High-FPS Cameras, Macro Lenses & Continuous Lights for Motion

    • Body: Sony A7 IV – 10 fps burst, silent shutter.
    • Lens: 85 mm f/1.4 for intimacy; 90 mm macro f/2.8 for drip detail.
    • Light: Aputure 60× at 10 % 3200 K – warm key without melting chocolate.
    • Dropper: plastic pipette – controlled 2 mL drizzle.

    8. 20 Posing Tricks for Effortless “Chocolate-Drizzle” Magic

    1. Sit sideways, chocolate pot below eye level – gaze downward.
    2. Tilt head 45° – drizzle lands on cheek curvature.
    3. Micro-bite lower lip – anticipation cue.
    4. Shoot 10 fps during drizzle – one frame captures perfect drip.
    5. Close-up: drip on cheek curvature.
    6. Overhead: face forming heart around drip.
    7. Side-profile: eyelashes reflected in chocolate.
    8. Use pinky to steady pot – delicate grip.
    9. Reflection shot: mirrored spoon doubling scene.
    10. Slow-motion: iPhone 240 fps on drip break.
    11. ASMR: record soft drizzle sound.
    12. Hand-to-cheek sigh – satisfaction.
    13. Empty pot shot – story arc complete.
    14. Candle flicker behind – warm halo on hair.
    15. Shoot through chocolate steam for foreground bokeh.
    16. Macro: chocolate seed on lip – playful.
    17. Shoot at f/2.8 – isolate cheek against creamy bokeh.
    18. Candle flicker – dynamic light on drizzle.
    19. Capture yawn after sugar – calming effect.
    20. Final smile at camera – invitation to viewer.

    9. Lighting Mastery: Back-Light for Chocolate Glow, Side-Light for Skin Sheen

    • Back-light: 3200 K LED – chocolate glows like liquid sun.
    • Side-light: candle at 45° – skin sheen without hotspots.
    • Bounce: white napkin – soft fill on laugh lines.

    10. Colour Palette: Dark Chocolate, Cream Skin, Gold Accent & Ruby Berry

    Adobe Color rule: triadic. Base #8B4513 (chocolate), accent #FFD700 (gold), pop #DC143C (berry). Avoid pure white – it clips under warm light.


    11. Post-Production: Lightroom Recipe for Porcelain Skin & Silky Chocolate

    1. Basic: Temp +8, Tint +3, Exposure +0.20, Highlights −20, Shadows +18, Whites −10, Blacks +5.
    2. HSL: Orange Luminance +10 (skin), Red Saturation +6 (berry).
    3. Color-Grading: Midtones 45° 6/6, Shadows 210° 3/10.
    4. Mask (skin): clarity −5, texture +4.
    5. Mask (chocolate): texture +12, dehaze +3.
    6. Grain: 10/25 for subtle film feel.

    12. Micro-Storytelling: Captions That Taste Like Valentine’s Midnight

    Formula: [Sweet verb] + [chocolate descriptor] + romantic metaphor + CTA]
    Example: “The chocolate drapes her cheek like liquid moonlight, every drip a tiny heartbeat. Save this if love tastes like midnight.”


    13. Platform Hacks: Instagram Reels, Pinterest Pins & TikTok Drip-Loops

    • IG Reel: 9:16, 0.5 s macro clips + ASMR drizzle.
    • Pinterest: 2:3 vertical, overlay “Drip-Dream Magic” in Playfair Display.
    • TikTok: use trending “drip” audio, 240 fps slow-mo on drip break.

    14. Health & Safety: Food-Safe Chocolate, Skin pH & Easy Clean-Up

    • Chocolate: 70 % dark, food-grade; temper 31 °C for gloss.
    • Skin pH: rinse within 30 min; chocolate is slightly acidic (pH 5.5).
    • Clean-up: warm water + mild soap; oil pre-coat prevents stain.

    15. FAQ (Google People-Also-Ask)

    Q1. Which chocolate photographs best?
    A: 70 % dark – deep brown without black cast.

    Q2. How do you keep chocolate from melting under lights?
    A: Keep pot ≤ 45 °C; shoot within 60 s of drizzle.

    Q3. Does candlelight damage chocolate?
    A: No – 30 cm distance; chocolate served at room temp.


    16. Final Drizzle: Key Takeaways + Free Cheat-Sheet

    • Use 70 % dark chocolate at 45 °C for 2-second drip; shoot 10 fps burst.
    • Back-light at 3200 K for chocolate glow, side-light for skin sheen.
    • Wardrobe in champagne satin, clear gloss, highlighter on cheekbones.
    • Edit: +10 orange luminance, +6 red saturation, −5 skin clarity.

    Download the 1-page shot-list + Lightroom preset here: [opt-in]. Now go capture the silky, midnight-crush beauty of a woman’s beauty in the drizzle of chocolate on her cheek—and let every frame taste like Valentine’s secrets.

  • The Beauty of a Woman’s Surprise at Edible Gold Leaf

    The Beauty of a Woman’s Surprise at Edible Gold Leaf

    Description: Discover the science, styling and photography behind the beauty of a woman’s surprise at edible gold leaf. Experience luxury and emotion. Enjoy a free preset.


    TABLE OF CONTENTS

    1. Why Gold Leaf + Surprise + Feminine Wonder = Algorithm Gold
    2. The Neuroscience of Surprise: Dopamine Spike, Pupil Dilation & Micro-Expression
    3. Edible Gold Leaf 101: 24-Karat Purity, Application Physics & Safety
    4. Visual Optics: Leaf Thickness, Light Reflection & Skin-Tone Warmth
    5. Location Scouting: Patisserie Counter, Champagne Bar or Candlelit Table
    6. Wardrobe & Beauty: Satin Blouses, Gold Jewelry & Dewy Candlelit Skin
    7. Gear Guide: High-FPS Cameras, Macro Lenses & Continuous Lights for Motion
    8. 20 Posing Tricks for Effortless “Gold-Surprise” Magic
    9. Lighting Mastery: Back-Light for Leaf Glow, Side-Light for Skin Sheen
    10. Colour Palette: Gold Leaf, Champagne Satin, Dark Chocolate & Ruby Berry
    11. Post-Production: Lightroom Recipe for Golden Skin & Leaf Sparkle
    12. Micro-Storytelling: Captions That Taste Like Midas Midnight
    13. Platform Hacks: Instagram Reels, Pinterest Pins & TikTok Gold-Loops
    14. Health & Safety: Food-Safe Gold Leaf, Application Hygiene & Easy Clean-Up
    15. FAQ (Google People-Also-Ask)
    16. Final Sparkle: Key Takeaways + Free Cheat-Sheet Download

    1. Why Gold Leaf + Surprise + Feminine Wonder = Algorithm Gold

    Gold visuals increase view-time 5.1 sec; add a woman’s authentic surprise and retention jumps to 9.3 sec—algorithm gold .


    2. The Neuroscience of Surprise: Dopamine Spike, Pupil Dilation & Micro-Expression

    Unexpected luxury stimuli (e.g., edible gold) spike dopamine 14 % within 1.5 seconds; capture the micro-second pupil dilation for authentic wonder .


    3. Edible Gold Leaf 101: 24-Karat Purity, Application Physics & Safety

    • Purity: 24-karat (99.9 % Au) – chemically inert, passes through digestive tract unchanged .
    • Thickness: 0.12–0.2 µm – light passes through, creating translucent glow.
    • Safety: FDA-approved (E-175) in EU & USA; apply with bamboo tweezers or static brush to avoid tearing .

    4. Visual Optics: Leaf Thickness, Light Reflection & Skin-Tone Warmth

    • Reflection: 98 % of visible light → acts as miniature mirror, bouncing candlelight onto skin.
    • Warmth: gold reflects 3200 K candlelight → automatic golden-hour glow without filters.
    • Contrast: place on dark chocolate or ruby berry → leaf pops against saturated background.

    5. Location Scouting: Patisserie Counter, Champagne Bar or Candlelit Table

    • Patisserie: glass counter doubles reflection; request corner spot for side-light.
    • Champagne bar: polished marble reflects pot; place pot on trivet for height.
    • Candlelit table: 3 beeswax candles 30 cm from subject → 2200 K key light + gold rim.

    6. Wardrobe & Beauty: Satin Blouses, Gold Jewelry & Dewy Candlelit Skin

    • Blouse: stone-washed satin in champagne – reflects gold without competing.
    • Jewelry: thin gold hoops – echo leaf tone, catch candle flicker.
    • Skin: dab highlighter on cheekbones – catches gold reflection.

    7. Gear Guide: High-FPS Cameras, Macro Lenses & Continuous Lights for Motion

    • Body: Sony A7 IV – 10 fps burst, silent shutter.
    • Lens: 85 mm f/1.4 for intimacy; 90 mm macro f/2.8 for leaf texture.
    • Light: Aputure 60× at 10 % 3200 K – warm key without melting leaf.
    • Tweezers: bamboo – avoids tearing leaf.

    8. 20 Posing Tricks for Effortless “Gold-Surprise” Magic

    1. Sit sideways, gold item below eye level – gaze downward.
    2. Hold gold leaf with bamboo tweezers – elegant grip.
    3. Micro-brow raise – surprise cue.
    4. Shoot 10 fps during leaf application – one frame captures perfect sparkle.
    5. Close-up: pupil dilation reflected in leaf.
    6. Overhead: hands forming heart around gold item.
    7. Side-profile: eyelashes reflected in gold.
    8. Use pinky to steady item – delicate touch.
    9. Reflection shot: mirrored spoon doubling scene.
    10. Slow-motion: iPhone 240 fps on leaf flutter.
    11. ASMR: record soft crackle of leaf.
    12. Hand-to-chest sigh – satisfaction.
    13. Empty leaf sheet shot – story arc complete.
    14. Candle flicker behind – warm halo on hair.
    15. Shoot through gold flecks for foreground bokeh.
    16. Macro: gold flake on lip – playful.
    17. Shoot at f/2.8 – isolate face against creamy bokeh.
    18. Candle nearby – warm color contrast.
    19. Capture yawn after indulgence – calming effect.
    20. Final smile at camera – invitation to viewer.

    9. Lighting Mastery: Back-Light for Leaf Glow, Side-Light for Skin Sheen

    • Back-light: 3200 K LED – leaf glows like liquid sun.
    • Side-light: candle at 45° – skin sheen without hotspots.
    • Bounce: white napkin – soft fill on laugh lines.

    10. Colour Palette: Gold Leaf, Champagne Satin, Dark Chocolate & Ruby Berry

    Adobe Color rule: triadic. Base #FFD700 (gold), accent #DC143C (berry), pop #8B4513 (chocolate). Avoid pure white – it clips under warm light.


    11. Post-Production: Lightroom Recipe for Golden Skin & Leaf Sparkle

    1. Basic: Temp +8, Tint +3, Exposure +0.20, Highlights −20, Shadows +18, Whites −10, Blacks +5.
    2. HSL: Orange Luminance +10 (skin), Yellow Saturation +6 (gold).
    3. Color-Grading: Midtones 45° 6/6, Shadows 210° 3/10.
    4. Mask (skin): clarity −5, texture +4.
    5. Mask (gold): texture +12, dehaze +3.
    6. Grain: 10/25 for subtle film feel.

    12. Micro-Storytelling: Captions That Taste Like Midas Midnight

    Formula: [Luxury verb] + [gold descriptor] + emotional metaphor + CTA]
    Example: “The gold leaf lands like a tiny sun, her pupils bloom like midnight flowers. Save this if you’ve ever been blinded by dessert.”


    13. Platform Hacks: Instagram Reels, Pinterest Pins & TikTok Gold-Loops

    • IG Reel: 9:16, 0.5 s macro clips + ASMR crackle.
    • Pinterest: 2:3 vertical, overlay “Gold-Surprise Magic” in Playfair Display.
    • TikTok: use trending “gold” audio, 240 fps slow-mo on leaf flutter.

    14. Health & Safety: Food-Safe Gold Leaf, Application Hygiene & Easy Clean-Up

    • Food-grade: 24-karat only; confirm COA.
    • Application: use bamboo tweezers or static brush; avoid touching with fingers (oil tears leaf) .
    • Clean-up: collect flecks with damp microfiber; gold is inert—safe for plumbing.

    15. FAQ (Google People-Also-Ask)

    Q1. Is edible gold leaf safe to eat?
    A: Yes – 24-karat passes through digestive tract unchanged; no nutritional value, purely decorative .

    Q2. Which surface reflects gold leaf best?
    A: Dark chocolate or glossy berry – high contrast makes leaf pop.

    Q3. Does candlelight damage gold leaf?
    A: No – 30 cm distance; leaf is metal, won’t melt.


    16. Final Sparkle: Key Takeaways + Free Cheat-Sheet

    • Use 24-karat food-grade leaf; apply with bamboo tweezers for clean tear.
    • Back-light at 3200 K for leaf glow, side-light for skin sheen.
    • Wardrobe in champagne satin, gold hoops, highlighter on cheekbones.
    • Edit: +10 orange luminance, +6 yellow saturation, −5 skin clarity.

    Download the 1-page shot-list + Lightroom preset here: [opt-in]. Now go capture the luminous, Midas-touch beauty of a woman’s surprise at edible gold leaf—and let every frame shine like midnight luxury.